Bluetooth Switch - Arduino
Bluetooth Switch - Arduino Summary
Bluetooth Switch - Arduino is a ad-supported Android app in Tools by One N One Apps. Released in Nov 2021 (4 years ago). It has about 3.5K+ installs Based on AppGoblin estimates, it reaches roughly 149 monthly active users and generates around $<10K monthly revenue (0% IAP / 100% ads). Store metadata: updated Jul 4, 2025.
Recent activity: 3.00 installs this week (16 over 4 weeks) showing steady growth View trends →
Store info: Last updated on Google Play on Jul 4, 2025 .
0★
Ratings: 0
Screenshots

App Description
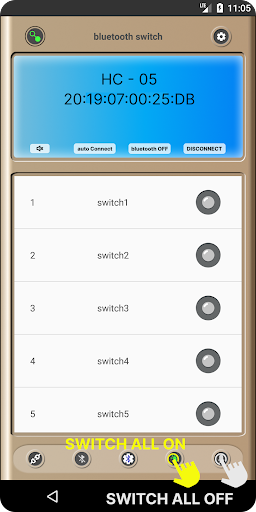
bluetooth switch with up to 26 buttons
Bluetooth Switch is an app that you can use to connect to your Arduino and turn the device on and off.
The app lets you control your device from your phone or tablet so you can turn it on and off without getting out of bed.
For example, you can use this app to turn lights, electrical appliances or other devices on or off.
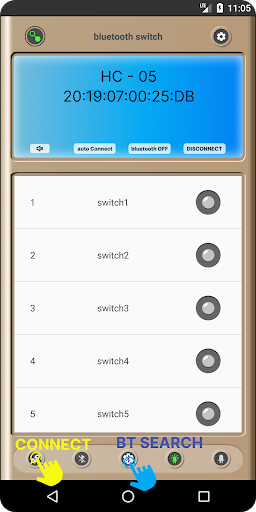
To use the Bluetooth Switch, you must first connect the Bluetooth module to the Arduino.
After connecting the bluetooth module, you need to open the app and pair it with the Arduino.
Once the pairing is complete, you can use the app to power on and off your device.
Bluetooth Switch is a useful application for anyone using Arduino.
This application allows you to control your device from your phone or tablet, which is very convenient and efficient.
Download Bluetooth Switch now and experience a new way to control your Arduino!
[function]:
- Can be used in connection with HC-05 and HC-06.
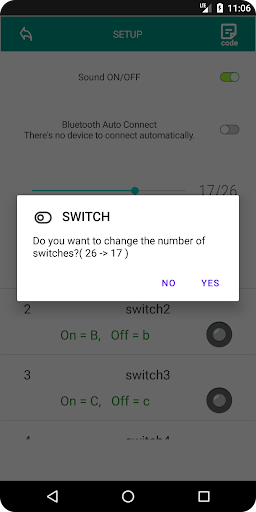
- You can select up to 26 buttons.
- All on the switch
- All switch off
- Send a specific character to the Arduino whenever the switch is on or off.
- You can change the toggle icon.
- You can change the name of the switch.
- If you set automatic connection, it will automatically connect to previously connected devices.
[Arduino Source Code Example]
#include
void allOn(){
digitalWrite(2, HIGH);
digitalWrite(3, HIGH);
digitalWrite(4, HIGH);
digitalWrite(5, HIGH);
digitalWrite(6, HIGH);
digitalWrite(7, HIGH);
digitalWrite(8, HIGH);
digitalWrite(9, HIGH);
}
void allOff(){
digitalWrite(2, LOW);
digitalWrite(3, LOW);
digitalWrite(4, LOW);
digitalWrite(5, LOW);
digitalWrite(6, LOW);
digitalWrite(7, LOW);
digitalWrite(8, LOW);
digitalWrite(9, LOW);
}
void setup() {
pinMode(2, OUTPUT);
pinMode(3, OUTPUT);
pinMode(4, OUTPUT);
pinMode(5, OUTPUT);
pinMode(6, OUTPUT);
pinMode(7, OUTPUT);
pinMode(8, OUTPUT);
pinMode(9, OUTPUT);
Serial.begin(9600);
allOff();
}
void loop() {
if(Serial.available()){
char rx_data=Serial.read();
// out On
switch(rx_data){
case '1':
allOn();
break;
case 'A':
digitalWrite(2, HIGH);
break;
case 'B':
digitalWrite(3, HIGH);
break;
case 'C':
digitalWrite(4, HIGH);
break;
case 'D':
digitalWrite(5, HIGH);
break;
case 'E':
digitalWrite(6, HIGH);
break;
case 'F':
digitalWrite(7, HIGH);
break;
case 'G':
digitalWrite(8, HIGH);
break;
case 'H':
digitalWrite(9, HIGH);
default:
break;
}
// out Off
switch(rx_data){
case '0':
allOff();
break;
case 'a':
digitalWrite(2, LOW);
break;
case 'b':
digitalWrite(3, LOW);
break;
case 'c':
digitalWrite(4, LOW);
break;
case 'd':
digitalWrite(5, LOW);
break;
case 'e':
digitalWrite(6, LOW);
break;
case 'f':
digitalWrite(7, LOW);
break;
case 'g':
digitalWrite(8, LOW);
break;
case 'h':
digitalWrite(9, LOW);
default:
break;
}
}
}